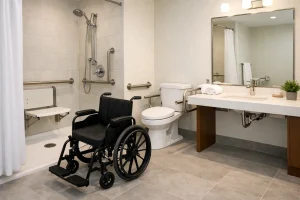

A bath that is becoming difficult to step into can change the way a whole household uses its home. This accessible bathroom conversion example shows how a conventional, cramped family bathroom can become a safer, calmer and more attractive space without making it feel clinical.
The aim was not simply to add grab rails and remove a bath. The homeowner wanted to stay comfortable and independent at home, while creating a room that would also work well for visiting family. Every choice needed to improve day-to-day use, from getting in and out of the shower to finding towels without bending or stretching.
The starting point: a bathroom that no longer suited daily life
The original room was a typical three-piece bathroom: a shower-over-bath along one wall, a pedestal basin opposite, and a close-coupled WC beside the window. It looked perfectly presentable, but it was not serving its owner well.
Stepping over the bath side had become unsteady, particularly in the morning. The shower screen narrowed the entry point, the basin offered no useful storage, and the glossy floor tiles could feel slippery when wet. There was also little room for someone to offer assistance if it was ever needed.
This is a common situation. Accessibility is rarely about one dramatic problem. More often, it is a collection of small frustrations that gradually make a familiar bathroom harder, and less safe, to use.
Accessible bathroom conversion example: the new layout
The best solution was to remove the bath and create a generously sized level-access shower across the back wall. This immediately made the room easier to enter and gave the layout a more open feel.
A low-profile shower tray was selected rather than a fully tanked wet room floor. Both can be excellent options, but this property had a compact upstairs bathroom and a tray provided clear shower boundaries with straightforward drainage. A wet room may be the better choice where a completely step-free floor is needed, where wheelchair access is likely, or where the room is large enough for a more open plan.
A fixed glass panel replaced a hinged screen. It kept splashes contained while leaving a wide, unobstructed shower entrance. The panel was deliberately kept simple, with minimal framing, so there were fewer awkward areas to clean.
Inside the shower, a thermostatic valve was positioned where it could be reached before stepping fully under the water. This reduces the risk of a sudden burst of hot or cold water. A height-adjustable shower rail allowed the handset to be used standing or seated, while an overhead shower added the more luxurious finish the homeowner wanted.
A fold-down shower seat was fitted to one wall. It takes up little space when folded away, but provides welcome support on days when standing for a full shower is tiring. Strong, neatly integrated grab rails were placed where they were genuinely useful: one by the entrance and one beside the seat. Their finish matched the brassware, helping the room feel coordinated rather than adapted as an afterthought.
Replacing hazards with practical comfort
The floor was one of the most important decisions in this conversion. Large-format porcelain tiles with a slip-resistant finish were chosen in a warm stone shade. They are durable, easy to maintain and less visually busy than small patterned tiles, which helped the compact room feel bigger.
Colour contrast was used carefully. The shower controls, grab rails and toilet seat were distinct enough from the surrounding finishes to be easy to identify, without turning the room into a high-contrast clinical environment. Good contrast can be especially helpful where eyesight is changing, but it should still suit the character of the home.
The basin was replaced with a wall-hung vanity unit. Raising it from the floor created a clearer sightline and made cleaning underneath easier. Wide drawers gave the homeowner accessible storage for toiletries and medication, avoiding the need to kneel down and search in a deep cupboard.
A comfort-height WC completed the main fittings. It is slightly taller than a standard toilet, making sitting and standing more comfortable for many people. However, there is no one-size-fits-all height. The right choice should reflect the main user’s height, mobility and preferences, rather than being selected from a catalogue without discussion.
Lighting, heating and the details that matter
Accessible design often succeeds or fails in the smaller details. In this room, bright but soft LED lighting was installed around the mirror, with ceiling lighting positioned to reduce shadows. Seeing the shower controls, floor edges and basin clearly is a genuine safety feature, not merely a finishing touch.
The illuminated mirror included demisting, so it remained useful after a shower. A heated towel rail was placed within easy reach of the shower exit, allowing a warm towel to be collected without crossing a wet floor. Underfloor heating was considered, but the homeowner preferred to keep the project scope focused and invest in a high-quality shower and storage instead.
That decision reflects a sensible approach to budget. Some elements, such as safe access, reliable waterproofing and suitable flooring, should never be compromised. Others, including extra lighting zones, premium finishes or underfloor heating, can be chosen according to priorities.
Why design before installation makes the difference
A successful accessible conversion is not achieved by fitting individual mobility products into an existing layout. The room needs to be planned as a whole. Measurements matter, but so does understanding how the customer moves around the room, whether they use a walking aid, and what may be needed in the years ahead.
For this project, the design process considered the route from the bedroom to the bathroom, the shower entrance width, turning space and the position of the door. Changing the door to open outwards was discussed, as this can provide more room inside and allow easier access in an emergency. In the end, the existing door arrangement worked once the bath had been removed, so there was no need to alter it.
Waterproofing was equally vital. Level-access showers and wet areas need careful preparation behind the finished surfaces, not just attractive tiles on top. A fully managed installation means the plumbing, drainage, wall preparation, tiling, fitting and finishing are coordinated from the start. That reduces disruption and helps avoid the gaps between trades that can cause delays or costly remedial work.
At The Bathroom Magician, this joined-up approach also gives homeowners the chance to see finishes, handles, tiles and shower options together before work begins. No jargon. No stress. Just a clear plan for a bathroom that works properly.
A room built for independence, not just immediate need
The completed bathroom felt brighter, more spacious and far easier to use. Most importantly, it gave the homeowner confidence. There was no bath edge to negotiate, no need to balance while reaching for a towel, and no shortage of useful storage.
It also remained a bathroom the homeowner was proud to show guests. The soft stone tiles, wall-hung furniture and coordinated brushed finishes created a contemporary look that suited the rest of the house. Accessibility and good design were not competing priorities. They supported each other.
Every home calls for its own solution. A downstairs cloakroom may be the right place for a compact walk-in shower, while another property may benefit from converting a larger family bathroom into a true wet room. The right starting point is an honest conversation about how the room is used now, what feels difficult, and what would make everyday life easier for years to come.