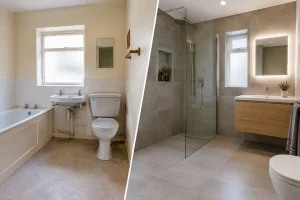

A before and after wet room renovation is about far more than replacing a shower enclosure with an open shower area. The most successful transformations change how the room feels to use every morning: easier to move around, simpler to clean, safer underfoot and more in keeping with the rest of the home.
For homeowners considering a bathroom update, the finished photographs can be inspiring. Yet the real value often sits behind the tiles and beneath the floor. A properly planned wet room combines practical drainage, careful waterproofing and a layout that makes the best use of every centimetre.
What a wet room looks like before the work begins
Many bathrooms begin with a familiar set-up: a bulky bath, a separate shower cubicle, tired tiles and limited clear floor space. In a compact room, the enclosure can make the whole layout feel cramped. Grout may be difficult to keep clean, and a high shower tray or bath side can become less comfortable to step over with time.
Sometimes the room is not visibly worn out, but simply no longer suits the household. A family may need a more hard-wearing space after busy school mornings. A couple planning to stay in their home long term may want to reduce trip hazards without creating a bathroom that feels clinical. In other cases, an awkwardly shaped en-suite has never offered enough room for a conventional shower enclosure.
Before any design choices are made, it is worth looking beyond the fittings. Where are the soil pipe and water supplies? Can the floor accommodate the required fall towards the drain? Is there enough ventilation? These details influence what is possible and help prevent unwelcome changes once installation has started.
Before and after wet room design: the changes that matter
The visual change can be dramatic. Removing a raised shower tray and enclosure gives the room a more open appearance, while large-format tiles or wall panels can reduce visual clutter. A frameless glass screen can contain spray without cutting the room in half, and a recessed niche keeps shampoo bottles off the floor.
However, a good transformation is not judged by looks alone. The aim is to create a room that works naturally for the people using it. That could mean positioning controls where they can be reached without standing under cold water, selecting a thermostatic shower for dependable temperature control, or allowing enough space beside the WC and basin for comfortable movement.
Colour and finishes also affect how spacious a wet room feels. Pale tones can brighten a small bathroom, but darker tile can look equally striking when paired with considered lighting. The right answer depends on the room’s natural light, ceiling height and the atmosphere you want to create. A practical design should still feel personal, not like a showroom display copied into your home.
A floor designed to drain properly
The defining feature of a wet room is its level-access shower area. Instead of water being contained by a tray, the floor is formed with a subtle slope leading to a drain. This can be a central point drain or a linear drain positioned along a wall.
The slope needs to be accurate enough for water to drain efficiently while remaining comfortable and stable underfoot. It is one reason a wet room should be treated as a specialist installation rather than a simple cosmetic update. The surface finish matters too: tiles need suitable slip resistance, particularly in a bathroom used by children, older relatives or anyone with reduced mobility.
A fully level floor is not always achievable in every property without additional work. Floor construction, pipe routes and the available depth can all affect the design. In some homes, a low-profile shower tray provides a similarly accessible feel with fewer structural changes. An honest survey should identify the best route before products are ordered.
Waterproofing that cannot be seen, but cannot be skipped
Behind a finished wet room is a waterproof tanking system. Walls and floors in the showering area are prepared and sealed before tiling or panelling begins, helping to prevent water travelling into the structure of the building.
This is not the stage to cut corners. Attractive tiles cannot compensate for poor preparation, and a leak hidden behind a wall can cause significant disruption later. Correct substrates, careful sealing around corners and pipe penetrations, and a properly installed drain all contribute to a bathroom built to last.
For this reason, a managed service can bring real peace of mind. At The Bathroom Magician, the design, product choices and installation are considered as one project, rather than leaving homeowners to coordinate separate trades and hope that every detail joins up correctly.
The practical improvements after a wet room installation
Once complete, a wet room often makes day-to-day life noticeably easier. With fewer ledges, corners and awkward shower doors, cleaning is more straightforward. Wall panels can be an especially appealing option for homeowners who would prefer fewer grout lines, while quality tiles offer a wide range of textures, patterns and finishes.
The open layout can also improve accessibility without sacrificing style. A fold-down seat, discreet grab rails and a handheld shower can be included where useful, but they should be chosen as part of the overall design. Mobility features are most effective when they feel integrated into the room rather than added as an afterthought.
There is a balance to strike. An open shower area will naturally allow more moisture into the room than a fully enclosed cubicle, so effective extraction is essential. A glass screen, sensible shower-head positioning and an appropriate floor layout help keep the rest of the bathroom comfortable and dry. For households that prefer a fully enclosed shower or share one busy family bathroom, a conventional shower enclosure may still be the better choice.
How to plan your own transformation
Start with how the bathroom is used, not with a tile sample. Consider who uses the space now, whether that is likely to change, and which parts of the current room cause frustration. A beautiful rainfall shower may be appealing, but storage, ventilation and lighting can have a greater impact on everyday satisfaction.
Bring measurements, photographs and a realistic idea of your budget to the initial discussion. A professional design appointment can then explore options that suit your room, including whether a full wet room, a walk-in shower or a low-level tray makes the most sense. It is also the right time to discuss the less glamorous but essential elements: waste pipe positions, wall condition, heating, extraction and electrical work.
Think about the finishes as a complete scheme. The shower area, basin unit, brassware, mirror lighting and towel rail should work together, but they also need to earn their place. A vanity unit adds useful storage. A well-placed illuminated mirror supports shaving and make-up. Underfloor heating can help a tiled floor dry more quickly and adds welcome comfort on cold Cambridgeshire mornings.
A change you feel every day
The best before and after wet room projects do not simply make a bathroom look newer. They remove small daily irritations and replace them with a space that feels calm, capable and made for the home it is in.
Whether your priority is a more luxurious showering space, easier cleaning or a bathroom that supports independence for years ahead, the detail behind the finished look matters. A careful survey and a design built around your routine are the right first steps towards a wet room you will enjoy using every day.