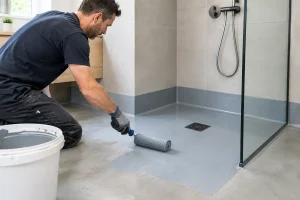

A wet room can make a bathroom feel larger, calmer and easier to use, particularly where step-free showering is a priority. But the finish only tells part of the story. Knowing how to waterproof a wet room properly means focusing on the layers beneath the tiles, where a small weakness around a drain, corner or pipe can lead to costly water damage later.
A well-built wet room is not simply a tiled bathroom with an open shower. It is a carefully planned, fully sealed space that directs water to the drain and protects the structure behind the walls and floor. Get that foundation right and you can enjoy a practical, low-maintenance bathroom that looks just as good years from now.
Start with a wet room design that manages water
Waterproofing begins before any membrane or tile is fitted. The layout needs to account for where water will land, how it will run across the floor and where it will drain away. This is especially important in compact bathrooms, where the shower area may be close to the door, vanity unit or WC.
The floor needs a gentle, consistent fall towards the drain. Too little fall and water can sit on the tiles. Too much can make the floor feel uneven underfoot or cause large-format tiles to sit awkwardly. The position and type of drain matter too. A central point drain generally requires falls from several directions, while a linear drain can allow a single fall across the shower area. Neither is automatically better – it depends on the room shape, tile choice and the look you want to achieve.
For homeowners planning an accessible bathroom, the same principles support safer everyday use. A level-access shower removes a trip hazard, but good drainage and carefully chosen slip-resistant flooring help keep the room comfortable and dependable.
What waterproofing a wet room actually involves
Tiles, grout and silicone are water-resistant finishes, not the waterproof barrier. Grout is porous to a degree, and sealant eventually needs renewing. The true protection comes from a tanking system installed behind the finish.
Tanking is the process of applying a waterproof layer to the floor and walls. Depending on the system, this may be a liquid membrane, a sheet membrane or waterproof boards with sealed joints. The chosen product should be designed to work with the adhesive, drain and tile system being used. Mixing incompatible materials is a risk not worth taking.
In a full wet room, the floor should be waterproofed throughout, not only inside the visible shower zone. Water splashes, runs and is carried underfoot, so stopping the tanking at an arbitrary line creates a vulnerable edge. Walls in and around the shower area also need full protection, with the waterproof layer taken high enough to deal with regular spray.
Prepare the floor and walls before tanking
A waterproof membrane is only as reliable as the surface beneath it. Floors and walls must be clean, stable, dry where required by the manufacturer, and free from dust, loose material or movement. If a floor flexes, tiles and grout may crack, allowing water to find a route below the finish.
Solid floors and timber floors need different preparation. A concrete floor may need levelling or forming to create the right drainage fall. Timber floors may need strengthening, suitable boarding and a purpose-made wet room former to produce a firm base with the required gradient. Simply trying to build a fall with adhesive while laying tiles is not a reliable approach.
Walls should be sound and suitable for a wet environment. Standard plasterboard is not the right choice in areas that will receive regular soaking. Waterproof backer boards or a correctly prepared masonry surface provide a much better foundation. Any boards must be properly fixed, with joints treated as part of the tanking system.
Fit the drain and floor former with care
The drain connection is one of the most critical details in any wet room. It has to be secure, accessible where future maintenance is needed and compatible with the waterproofing system. The membrane must form a watertight seal to the drain flange, rather than merely finishing near its edge.
A wet room former, or shower former, is often used to create accurate falls around the drain. It is fitted into or onto the floor structure and provides the shaped surface for tiling. The surrounding floor then needs to meet it neatly, without dips or raised transitions that could hold water.
Before the waterproofing is applied, check the falls in more than one direction. This simple step can prevent the frustration of discovering puddles after the room is finished. It is far easier to correct drainage at this stage than once the tiles are down.
Apply the tanking system in the right order
Every proprietary system has its own instructions, and those instructions should guide the installation. The usual process starts with any required primer, followed by waterproof tape at all internal corners, wall-to-floor joints and board joints. Pre-formed corner pieces can give particularly reliable coverage where several surfaces meet.
The membrane is then applied across the floor and up the walls, with careful attention around pipe penetrations, niches and the drain. These are the areas most likely to fail if rushed. Pipes should be sealed using appropriate collars or reinforcement pieces, not simply covered with extra adhesive or silicone.
Liquid tanking products are commonly applied in two coats, with the second coat running in a different direction to help create even coverage. Sheet systems need correctly sealed overlaps. Whichever method is used, the finished membrane should be continuous, with no gaps, pinholes or unsealed changes of direction.
Allow the waterproofing to cure fully before tiling. Drying times vary with the product, room temperature and humidity, so this is not a stage to judge by appearance alone. Rushing ahead can compromise the bond or the waterproof layer itself.
Test before tiles hide the important work
Where practical, a water test is a sensible final check before tiling. The drain is temporarily blocked and a shallow amount of water is held on the floor for the recommended period, then the surrounding areas and ceilings below are inspected for signs of moisture. This is particularly valuable for bathrooms above ground floor level.
Not every site allows the same testing method, and a professional installer will assess what is appropriate for the property. The principle remains the same: identify problems before the decorative finish makes them difficult and expensive to reach.
Tile for safety as well as style
Once the room has passed its checks, use a flexible tile adhesive and grout suitable for wet areas. Tile size deserves more thought than many people expect. Large tiles can create a clean, contemporary look, but on a floor that falls towards a point drain they may require precise cutting and planning. Smaller tiles or mosaics follow multi-directional falls more easily and can offer more grout lines for grip.
Choose a floor tile with a suitable slip resistance rating, especially for family bathrooms and mobility-focused spaces. A beautiful polished tile may be better suited to a wall than a floor that will regularly be wet. Good lighting, an effective extractor fan and a shower screen or fixed panel can also help limit water travelling through the room.
Silicone sealant is fitted at movement joints, such as wall-to-floor junctions and around fixtures. It creates a neat, flexible finish, but it is not a substitute for tanking. Inspect it periodically and replace it if it becomes cracked, mouldy or starts to lift.
Common mistakes that cause wet room leaks
The most expensive errors are often invisible at first. Tiling directly onto an unprepared floor, relying on grout as waterproofing, failing to seal around pipework, or using a drain that does not integrate with the membrane can all allow water into the building fabric.
Poor drainage is another common problem. If the floor falls are inaccurate, water may remain in corners or travel beyond the shower area. This can make the room harder to keep clean and place unnecessary strain on seals and finishes over time.
There is also a practical trade-off between saving money on the hidden elements and investing in a system that is designed to last. Premium tiles will not compensate for poor preparation. In a wet room, the workmanship beneath the surface is what protects the investment above it.
When professional installation makes sense
Waterproofing a wet room involves plumbing, drainage, floor construction, membranes, tiling and finishing details working together. For a straightforward ground-floor conversion, an experienced DIYer may be able to follow a tested system closely. For timber floors, upstairs bathrooms, complex layouts or accessible designs, professional planning and installation provide valuable reassurance.
A fully managed bathroom project also means the design, products and fitting sequence are considered together, rather than leaving you to coordinate separate trades. At The Bathroom Magician, that joined-up approach helps ensure a wet room feels considered from the first sketch to the final seal.
The best wet rooms never announce the work that has gone into them. Water drains away quietly, the floor feels secure underfoot and the room remains easy to live with. Give the waterproofing the attention it deserves, and the result can be a bathroom that brings daily comfort without hidden worries.